

Practice Manager Integration
Important
The controls explained in this section are available to RadiusCore Administrators only.
Each RadiusCore subscription can have a Practice Manager account linked to it. This allows RadiusCore to:
- use the selected practice management account for integrations in various templates (i.e., Workpapers); and
- allow users to access data from the selected practice management account without making it a shared subscription connection, thus restricting what information is accessible to standard users.
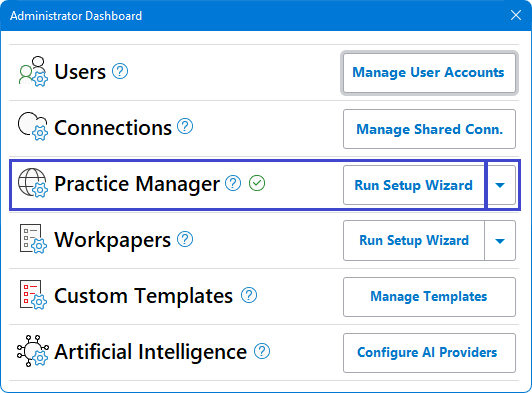
To configure a subscription's Practice Management connection either:
- Select Run Setup Wizard from the Administrator Dashboard to launch the four-step setup wizard. This is required for first-time setup.
- Using the drop-down menu, select a specific component to configure.
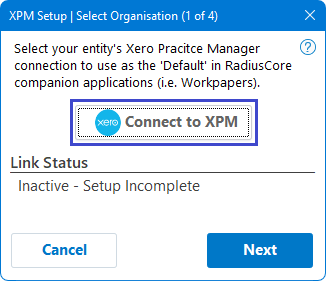
Step 1: Xero Practice Manager connection
Select a Xero Practice Manager connection to link to your RadiusCore subscription.
-
To connect a new Xero Practice Manager organisation to RadiusCore:
- Ensure the user has the Authorise 3rd Party Full Access permission in Xero Practice Manager.
- Select [New Practice Manager Connection] in the RadiusCore connection menu.
- In your default web browser, select the appropriate Xero Practice Manager connection and select Continue.
Tip
For detailed instructions on establishing a new RadiusCore connection, see Establishing a New Connection
-
To use an existing Xero Practice Manager RadiusCore connection:
- Select the appropriate Xero Practice Manager organisation from the Shared or Personal connection list.
- Xero Practice Manager connections are identified in RadiusCore's connection list by the appended
(XPM).Tip
For detailed instructions on selecting an existing RadiusCore connection, see Using an Existing Connection
Step 2: Business Structures
Setup business structures to match Xero Practice Manager per Business -> Settings -> Client Settings.
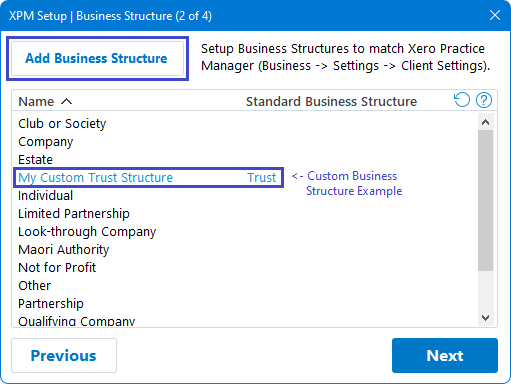
- Default business structures are pre-populated and cannot be changed.
- To add a custom business structure, select Add Business Structure.
- To edit or delete an existing business structure, double-click the relevant item listed in the table. Only custom business structures (highlighted blue) can be edited.
Step 3: Job State
Setup job states to match Xero Practice Manager per Business -> Settings -> Job Settings -> Job State.
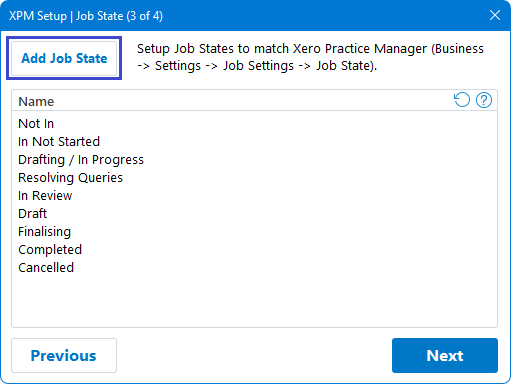
- To add a new job state, select Add Job State.
- To edit or delete a an existing job state, double-click the relevant item listed in the table.
- Use drag-and-drop to reorder existing job states within the table.
Step 4: Billable Rates (Optional)
Note
Configuring billable rates are optional; they only need to be completed if wanting to use estimated work in progress calculation.
Setup staff Billable Rates to match Xero Practice Manager per Business -> Settings -> Staff -> {Select Staff} -> Financials & Performance.
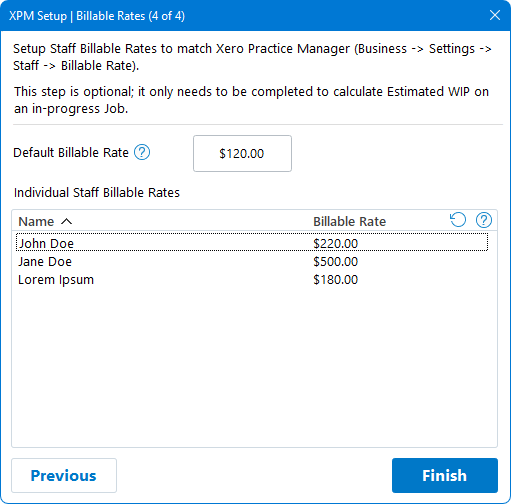
- A default billable rate can be assigned, which will apply when calculating WIP if a staff does not have a billable rate set.
- To edit a billable rate, double-click the relevant staff member in the table.